How To – Tasks and Transformations: Foreach File Loop
May 19, 2011
I left off last time discussing the SSIS File System task. Although that task does enable convenient bulk file operations, it’s limited due to its lack of wildcard support. Say I need a workflow that routinely copies all of the previous hour’s work orders to another location. By itself, the File System task is only helpful if the work orders are already grouped, which is unlikely. To help handle these more complicated operations, SSIS has a Foreach Loop Container task, which I will explore in this post.
Background:
The Foreach Loop Container task allows you to iterate over a list of items and run additional tasks on each item that’s enumerated. This post is going to focus solely on file enumeration, which is one of several enumeration options offered by the Foreach Loop container. In fact, the Foreach Loop container can enumerate all of the following types:
Enumerator PurposeADO Enumerate rows in tablesADO.NET Schema Rowset List schema information about a data source, such as the list of tables in a SQL Server databaseFile Enumerate files in a folderFrom Variable Enumerate the enumerable object that a variable contains. For instance, if a variable contains a DataTable or an array, you can enumerate its values.Item List items in a collection, such as the names of executables in an Execute Process taskNodeList List the items in a XPath expression result setSMO Enumerate SMO objects, such as the views in a SQL database
In Biml, each enumerator type is associated with its own task. Thus, instead of using the Foreach Loop Container task, you would use the Foreach File Loop task.
The Foreach Loop Container task enumerates each file in a directory, allowing you to run other tasks on those files. This task also allows you to filter the files you want to enumerate using wildcards, whereas the File System task is limited to either all files in a directory or a particular file. That’s the difference that’s going to enable more flexible file operations.
The scenario I’m going to demonstrate is archiving all .csv files in a directory.
Using BIDS:
To get started, you need to find the Foreach Loop Container in the Toolbox.

Drag and drop the task on the package’s design surface. Notice that this task has some differences from the previous tasks I’ve demonstrated. First, there’s no red X icon; in fact, the error list remains empty after adding the task. Second, this is the first task with a beige area underneath its name. The beige area is where you can add other tasks that reside in the container. When the task enumerates over the list of files, it will execute the workflow within its container for each file.

Double click on the task to open its editor dialog.

Click on the Collection list item on the left side of the dialog to display the Collection settings.

By default, the Foreach Loop task uses a file enumerator, which is what you want. Note that if you click on the Foreach File Enumerator value, you’ll see a down arrow button.

Clicking on the arrow button opens a dropdown that lets you choose a different enumerator.

Beneath the Foreach Loop Editor property grid is the Enumerator configuration group. This is where you specify what files to enumerate.

For this scenario, you first need to specify the directory that contains the .csv files to be archived. To do that, enter the folder path in the Folder text box. Note that you can also use the Browse button to display a folder selector dialog to help retrieve the folder path.

This path indicates that the task will enumerate files within the ForEachContainerFiles directory.
With the folder path identified, you now need to specify the files to enumerate. The default value indicates that all files in the folder path will be listed. However, the goal here is to only archive .csv files, skipping files with other types. To specify just .csv files, type in .csv to specify that file extension. The star character indicates that zero or more characters are acceptable. Be sure to remove the star on the right size as *.csv could unintentionally return files as such bob.csvc.
Note that the Files textbox isn’t limited to specifying file extensions. Say you had files with dates embedded in their file name, like sales03-05-11.csv. You could use the Files text box to just archive files with dates in October or files of a particular year.
Beneath the Files text box is the Retrieve file name group box. This group box lets you specify the format in which each file is returned. There are three formats to choose from:
Format ExampleFully qualified C:varigenceSamplesT&T BlogForEach ContainerFilesresults1.csvName and extension results1.csvName only results1
Since you will be performing file operations, having the fully qualified path will be useful. Thus, click on the Fully qualified radio button to select that format.
Finally, the Traverse subfolders checkbox lets you decide if the Foreach Loop Container will search subfolders, beneath the folder path, for files that meet your criteria.

With the enumerator setup done, you now need to store the current file path as the enumerator proceeds. This can be done using a variable. To set this up, first click on the Variable Mappings list item on the left side of the dialog.

As no variables have been created yet, you’ll need to add one. Do that by clicking inside the Variable cell.

A dropdown button will appear. Click on the dropdown button to open a list that contains a New Variable item.

Click on the New Variable item to open the Add Variable dialog box.

The first change you need to make is the container. This whole Package doesn’t need to know about this variable; just the ForEach Loop container. To change the variable’s container, click on the Container’s down arrow button to open a pop-up.

Expand the tree view nodes in the pop-up to reach the Foreach Loop container that you created. Click on it to select it and then press OK.
Next, I recommend changing the variable’s Name to something clearer, such as CsvFilePath. The other values can remain unchanged.

Press OK to create the variable and dismiss the dialog.

Notice that the CsvFilePath variable has been mapped to a 0 index. While it turns out that this is correct, it’s worth understanding what this means. For the moment, let’s say that instead of enumerating a list of files, you need to iterate over a row set, where each row has some columns.
Name Street Zip Code
Row 1 Microsoft 1 Microsoft Way 98052Row 2 Apple 1 Infinite Loop 95014Row 3 Intel 2200 Mission College Blvd. 95054
In this case, if you wanted to operate on the Street value for a row, as the enumeration occurs, you would create a variable and map it to index 1. You would map to index 1, instead of index 2, since despite Street being the second column, indexes are zero based. For the file enumerator, despite thinking about it as a list of files, it’s internally treated like a table where each row represents an item in the collection and the table has one column for the file path. Thus, BIDS maps the variable to index 0.
Now you can press OK to dismiss the Foreach Loop editor dialog.
The next step is to place the File System task within the Foreach Loop container so it can run as the list of files is enumerated. To do that, find the File System task in the Toolbox window.

Then drag and drop the File System task on top of the container.

You can review my previous blog post on the File System task for step by step instructions on how to set it up. In brief, start by opening the File System Task editor dialog.
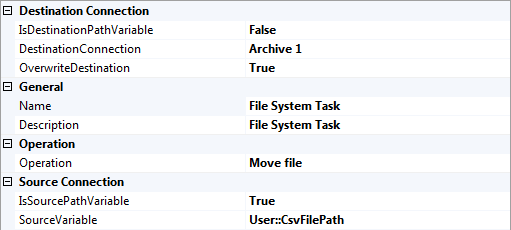
First, change the operation type from Copy file to Move file.

Second, set the Source Connection group’s IsSourcePathVariable to true. That will change the SourceConnection property to SourceVariable. In the SourceVariable dropdown, select User::CsvFilePath.
Third, create a Destination Connection, with its usage type set to Existing Folder. The File Connection’s Folder path should be the directory where the files will be archived.

Your File System task editor dialog should now look like:
You can now try to run your package. But if you do, you’re going to get a build error as the File System task has a red X icon. Checking the error list, you’ll see:

This is because no value was entered for the variable. This is counterintuitive since the whole point of this approach is that the enumerator will populate the variable as it runs. However, the validator isn’t that smart so you’ll need to workaround this bug by giving the variable a value that will be overwritten once the workflow runs. To do that, first click on the Foreach Loop Container task to select it.

Then, open the SSIS menu in the BIDS menu bar and select Variables.

This opens the Variables tool window for the Foreach Loop container. Next, double click on the value cell for the CsvFilePath variable.

In the cell, type in anything, such as Placeholder. Then press enter.

This will resolve the error, although the error list may not immediately reflect it. I had to close my package and reopen it to get the error list to update.
Using Mist:
Now it’s time to discuss implementing a Foreach File loop in Mist.
To start, you’ll need to create a package. If you’re unfamiliar with how to create a package, you can follow the first couple steps in the Mist User Guide’s Creating a Package topic.
Once you’ve opened the package, navigate to the Toolbox tool window.

Notice that there’s a Container group in the tree view. The Foreach File Loop container is within the ForEach sub group. Select and drag the Foreach File Loop container onto the Package’s design surface.

Unlike BIDS, there is a red X icon on the Foreach File Loop container since it has errors.

Mist requires you to provide values for the Folder and FileSpecification properties.
Notice that to the right of the red X icon, there’s a magnifying glass icon. I’ll explain that later in this post.
Click on the Package Details tab to see the tool window’s contents.

Matching the BIDS sample, the first step is to enter the Folder and File Specification for the Foreach File Loop container. You can enter the Folder path in the Folder textbox. You can enter the wildcard, for the files you want enumerated, in the File Specification text box.

The Retrieve File Name format defaults to Fully Qualified so that doesn’t need to change. You can check the Process Subfolders checkbox to enable that behavior.

Next up, you need to create a variable mapping. To do that, go into the ribbon and find the Variable Mapping button.

Notice that the button is in a group named Task Specific. As you select different tasks in a package, the buttons in the Task Specific group will change to be appropriate for the selected task. Press the button to create a variable mapping.

The mapping is added in the Foreach File Loop container’s Variable Parameter Mappings data grid. If you double click on the Parameter Name cell in the mapping’s row, you can change the mapping’s name. If you double click on the variable cell, a combo box will appear, indicating that no variable has been selected.

Clicking on the combo box will bring up a listing of the task’s built-in variables.

Of course, you will want to create a new variable. To do that, return to the ribbon and press the Variable button.

The Variables tool window will be brought to the front of the Mist UI, with a new variable created and already selected. You can change the variable’s name by double clicking on the name cell and then typing in the name you want. To match the BIDS sample, I’ve named the variable CsvFilePath.

Next, return to the package details tool window and in the variable mapping, reopen the Variable combo box. You can now select the CsvFilePath variable.

With that, the Foreach File Loop task is set up.

Notice that in the Variable cell, the variable’s scope is included in the name, meaning that you can easily see the variable is in Foreach File Loop 1, which resides in Package1. Also notice that on the errors tab to the left, there are 0 errors, confirming that every required property has been filled in.
With that done, you can add the File System task within the Foreach File Loop container. Find the File System task in the Toolbox tool window.

Then drag and drop it on top of the Foreach File Loop container.

Now I’m ready to talk about the magnifying glass icon in the Foreach File Loop’s header. If you click on the magnifying glass, you’ll see the following:

The magnifying glass makes the entire design surface dedicated to the Foreach File Loop task. Admittedly, you wouldn’t need this feature for this simple scenario. However, it comes in very handy if you’re implementing a complicated workflow within a container. Instead of having to repeatedly resize the container, or scroll within it, you can easily take advantage of your screen real estate. Returning to the package view is also easy; just click on Package1 in the breadcrumb bar.

To finish the sample, you’ll need to populate the File System task with appropriate values. You can refer to my previous blog post for details on using that task. When done, the File System task’s details editor should look as follows:

If you want to play with this sample, you can download it from here.
More Information:
It’s important to note that if you have a Foreach File Loop where you modify the collection during execution, it can have unintended side effects. Microsoft explicitly warns users that unexpected situations may occur due to files being added, deleted, or renamed during execution. If you’re going to implement a workflow where you process a file and then archive it, you might consider using two Foreach File Loop containers. The first processes each file. The second performs the move operations. That way, there’s no risk that files may not be processed as the enumeration changes due to the file moves.
Links:
Foreach File Loop Element - BIML
Foreach Loop Container - MSDN
Foreach Loop Container – Collection Page - MSDN
Craig